ECP5 is a great FPGA, it was reversed in Trellis, it’s bigger than ICE40 that was reversed before in icestorm project. And it have lots of cool stuff like
multipliers
serdes
25klut min (85 max)
and lots of memory bits
But ECP5 board available on the web are little bit expensive (if you have nothing to do with it ;). Even the OrangeCrab will be about 80$ minimum (but with DDR3 and USB on it).
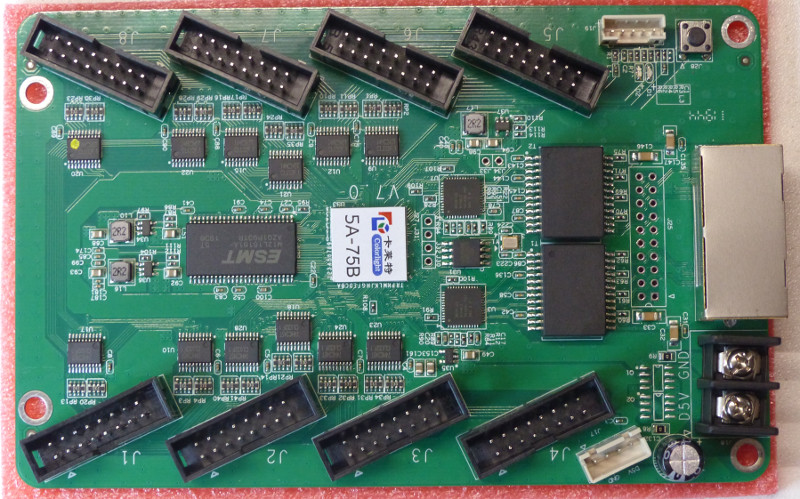
There is a rumor on the web that this leds display board include an ECP5 :
The Board as received
It’s really interesting, because this board cost only $15 ! With the dual SDRAM (M12L16161A) provided and its dual gigabit ethernet phy (Boardcom B50612D B1KMLG). For this low-cost price I order one of course.
Removing the sticker unveil an ECP5 25k !
I just received it and if we remove the sticker we see a Lattice ECP5 ( LFE5U-25F-6BG256C).
We can then load a simple blinker bitstream with openFPGALoader. But first, we have to synthesize one. Trabucayre gave me a simple blinker project I added to the BLP (Blinking Led Project).
This project require yosys, nextpnr and trellis to be installed. Installations instructions are given on trellis repository.
$ git clone --recursive https://github.com/SymbiFlow/prjtrellis
$ cd prjtrellis/libtrellis
$ cmake -DCMAKE_INSTALL_PREFIX=/usr .
$ make
$ sudo make install
Formal prove is a great method to find bugs into our gateware. But for many years, this was reserved to big companies with lot of $$. Some years ago, Clifford opened the method with it’s synthesis software Yosys. Explanation about formal prove with Yosys-smtbmc and can be found in this presentation. Dan Guisselquist (ZipCPU) give lot of great tutorials on formal prove with Verilog and SystemVerilog design on it’s blog. It’s a good start to learn formal prove.
But, Yosys-smtbmc is made for Verilog (and a bit of SystemVerilog). It’s too bad but it’s the only open source formal tool available for gateware.
How can we prove our VHDL, Clash or Chisel gateware ?
One of the solution consist of writing a TOP component in SystemVerilog that integrate the assume/assert/cover method and instantiate our DUT in it. It’s the way Pepijn De Vos choose for verifying it’s VHDL gateware. Its VHDL code is converted into Verilog with the new GHDL feature not-yet-finished and a systemVerilog top component instantiate the VHDL gateware converted in verilog by GHDL synthesis feature.
That’s an interesting way to do it and it can be done in the same way with Chisel. But it’s a bit limited to input/output ports of our gateware. If we want to add some property about internal counters or flags or others internals states machines registers, we have to export it with some conditional preprocessor value like follows:
`ifdef FORMAL
// Declare some signal output ports
`endif
It’s became little bit difficult to do that with chisel and its blackbox system. Then if we want to include formal property under the verilog generated module, we have to open the generated verilog code and write it directly.
It’s not a lasting solution. Because each time we regenerate Verilog code from Chisel, each time we have to re-write formal properties. It’s rapidly become a pain !
To (temporarily) fix this problem a little python tools has been written by Martoni for injecting rules automatically under generated Verilog module. We will see how it’s work in this article with a simple project named ChisNesPad.
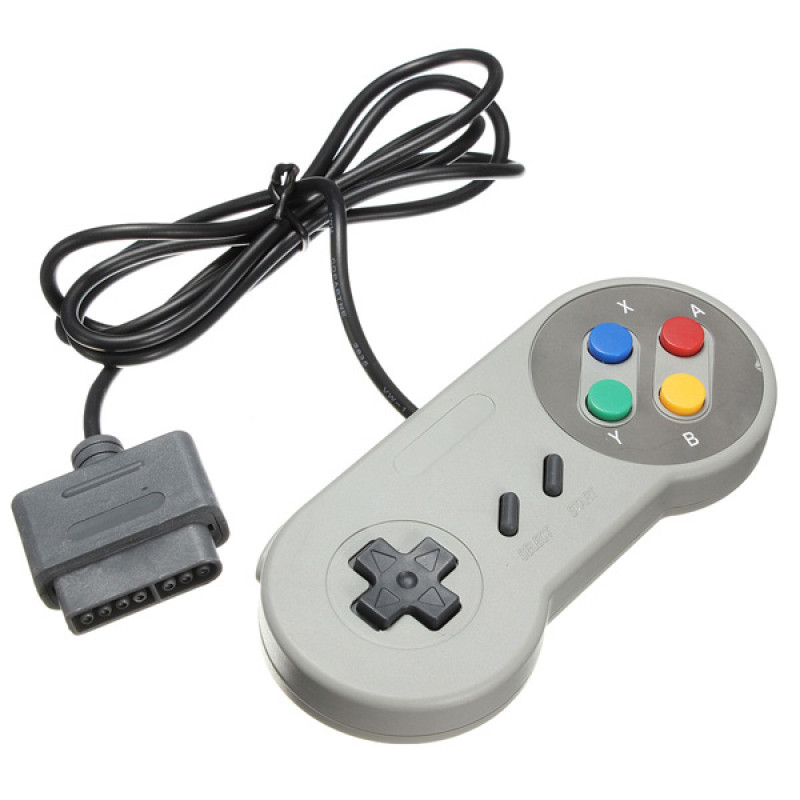
ChisNesPad project
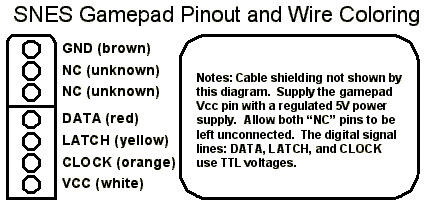
ChisNesPad is a little project that aim to drive Super Nintendo Pad with an FPGA.
In electronic point of view, super nes controller is simply a 16 bits shift register.
The gamepad pinout is relativelly easy to find on the web.
SuperNes gamePAD pinout
For FPGA point of view 3 signals interest us :
DATA : Gamepad output for serial datas
LATCH: Game pad input to take a « picture » of 16 buttons
A command named smtbmcify will then be available on system :
$  smtbmcify -h
Usages:
$ python smtbmcify.py [options]
-h, --help             print this help message
-v, --verilog=module.v verilog module to read
-f, --formal=formal.sv formals rules
-o, --output=name.sv   output filename, default is moduleFormal.sv
To use smtbmc formal tools with smtbmcify we will need two more source/configuration files :
ChisNesPadRules.sv That contain SystemVerilog formals properties
ChisNesPadRules.sby That contain yosys-smtbmc script configuration
These two files must be saved in formal/ directory. sby files are SymbiYosys configuration files, installation instruction of SymbiYosys can be found here.
For simply testing, the rule (written in file ChisNesPadRules.sv) we want to « inject » is following:
//BeginModule:ChisNesPad

always@(posedge clock) begin
    assume(io_dlatch == 1'b1);
    assert(stateReg == 2'b00);
end

//EndModule:ChisNesPad
With this rule, we assert that if io.dlatch output is 1, the internal stateReg will be set to sInit state (00).
The comments BeginModule and EndModule must be set with the exact chisel module name :
//...
class ChisNesPad (val mainClockFreq: Int = 100,
                  val clockFreq: Int = 1,
                  val regLen: Int = 16) extends Module {
  val io = IO(new Bundle{
//...
Hence, the tool smtbmcify will find the module in verilog generated module and inject the rules at the end of it:
Ok the test we done so far PASS without problem. Let’s find a bug adding this rules in ChisNesPadRules.sv :
always@(posedge clock) begin
    assert(regCount <= 16);
end
This rule generate a FAIL :
$ make
cd ..;sbt "runMain chisnespad.ChisNesPad"
[info] Loading project definition from /home/fabien/myapp/chisNesPad/project
[info] Loading settings for project chisnespad from build.sbt ...
[info] Set current project to chisNesPad (in build file:/home/fabien/myapp/chisNesPad/)
[warn] Multiple main classes detected.  Run 'show discoveredMainClasses' to see the list
[info] running chisnespad.ChisNesPad
Generating Verilog sources for ChisNesPad Module
[info] [0.004] Elaborating design...
[info] [1.735] Done elaborating.
Total FIRRTL Compile Time: 1396.1 ms
[success] Total time: 5 s, completed Feb 3, 2020 9:49:48 PM
smtbmcify -v ../ChisNesPad.v -f ChisNesPadRules.sv -o ChisNesPadFormal.sv
Generating file ChisNesPadFormal.sv
1 module will be filled :
ChisNesPad
rm -rf ChisNesPad
sby ChisNesPad.sby
SBY 21:49:48 [ChisNesPad] Copy 'ChisNesPadFormal.sv' to 'ChisNesPad/src/ChisNesPadFormal.sv'.
SBY 21:49:48 [ChisNesPad] engine_0: smtbmc
SBY 21:49:48 [ChisNesPad] base: starting process "cd ChisNesPad/src; yosys -ql ../model/design.log ../model/design.ys"
SBY 21:49:49 [ChisNesPad] base: finished (returncode=0)
SBY 21:49:49 [ChisNesPad] smt2: starting process "cd ChisNesPad/model; yosys -ql design_smt2.log design_smt2.ys"
SBY 21:49:49 [ChisNesPad] smt2: finished (returncode=0)
SBY 21:49:49 [ChisNesPad] engine_0: starting process "cd ChisNesPad; yosys-smtbmc --presat --unroll --noprogress -t 30 --append 0 --dump-vcd engine_0/trace.vcd --dump-vlogtb engine_0/trace_tb.v --dump-smtc engine_0/trace.smtc model/design_smt2.smt2"
SBY 21:49:49 [ChisNesPad] engine_0: ##   0:00:00  Solver: yices
SBY 21:49:49 [ChisNesPad] engine_0: ##   0:00:00  Checking assumptions in step 0..
SBY 21:49:49 [ChisNesPad] engine_0: ##   0:00:00  Checking assertions in step 0..
SBY 21:49:49 [ChisNesPad] engine_0: ##   0:00:00  Checking assumptions in step 1..
SBY 21:49:49 [ChisNesPad] engine_0: ##   0:00:00  Checking assertions in step 1..
SBY 21:49:49 [ChisNesPad] engine_0: ##   0:00:00  BMC failed!
SBY 21:49:49 [ChisNesPad] engine_0: ##   0:00:00  Assert failed in ChisNesPad: ChisNesPadFormal.sv:230
SBY 21:49:49 [ChisNesPad] engine_0: ##   0:00:00  Writing trace to VCD file: engine_0/trace.vcd
SBY 21:49:49 [ChisNesPad] engine_0: ##   0:00:00  Writing trace to Verilog testbench: engine_0/trace_tb.v
SBY 21:49:49 [ChisNesPad] engine_0: ##   0:00:00  Writing trace to constraints file: engine_0/trace.smtc
SBY 21:49:49 [ChisNesPad] engine_0: ##   0:00:00  Status: failed (!)
SBY 21:49:49 [ChisNesPad] engine_0: finished (returncode=1)
SBY 21:49:49 [ChisNesPad] engine_0: Status returned by engine: FAIL
SBY 21:49:49 [ChisNesPad] summary: Elapsed clock time [H:MM:SS (secs)]: 0:00:00 (0)
SBY 21:49:49 [ChisNesPad] summary: Elapsed process time [H:MM:SS (secs)]: 0:00:00 (0)
SBY 21:49:49 [ChisNesPad] summary: engine_0 (smtbmc) returned FAIL
SBY 21:49:49 [ChisNesPad] summary: counterexample trace: ChisNesPad/engine_0/trace.vcd
SBY 21:49:49 [ChisNesPad] DONE (FAIL, rc=2)
make: *** [Makefile:10: ChisNesPad/PASS] Error 2
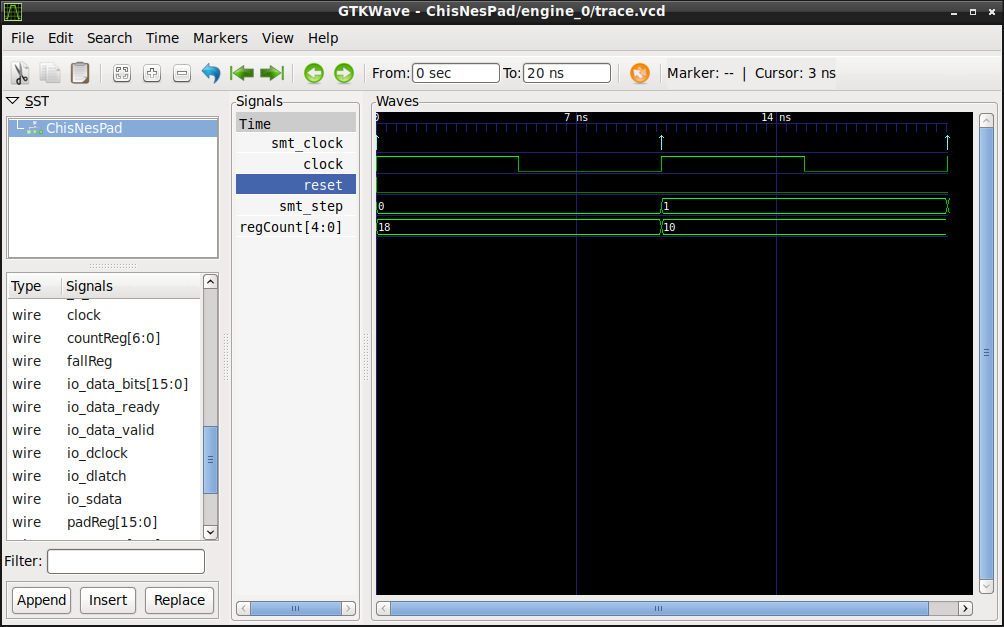
An error is found at second step. A vcd trace is generated that we can see with gtkwave:
$ gtkwave ChisNesPad/engine_0/trace.vcd
Formal engine found a bug, and print it as a VCD trace
We can also get verilog testbench that reproduce the bug under the same directory (trace_tb.v).
The problem here is that we didn’t define initial reset condition as explained in ZipCPU course. To solve this problem we have to change the rule adding initial rules (reset should be set at the begining) and assert counter value only when reset is not set :
initial
    assume(reset==1'b1);

always@(posedge clock) begin
    if(reset == 1'b0)
        assert(regCount <= 16);
end
With that rules, it pass :
$ make
cd ..;sbt "runMain chisnespad.ChisNesPad"
[info] Loading project definition from /home/fabien/myapp/chisNesPad/project
[info] Loading settings for project chisnespad from build.sbt ...
[info] Set current project to chisNesPad (in build file:/home/fabien/myapp/chisNesPad/)
[warn] Multiple main classes detected.  Run 'show discoveredMainClasses' to see the list
[info] running chisnespad.ChisNesPad
Generating Verilog sources for ChisNesPad Module
[info] [0.004] Elaborating design...
[info] [1.612] Done elaborating.
Total FIRRTL Compile Time: 1324.0 ms
[success] Total time: 5 s, completed Feb 3, 2020 10:04:37 PM
smtbmcify -v ../ChisNesPad.v -f ChisNesPadRules.sv -o ChisNesPadFormal.sv
Generating file ChisNesPadFormal.sv
1 module will be filled :
ChisNesPad
rm -rf ChisNesPad
sby ChisNesPad.sby
SBY 22:04:38 [ChisNesPad] Copy 'ChisNesPadFormal.sv' to 'ChisNesPad/src/ChisNesPadFormal.sv'.
SBY 22:04:38 [ChisNesPad] engine_0: smtbmc
SBY 22:04:38 [ChisNesPad] base: starting process "cd ChisNesPad/src; yosys -ql ../model/design.log ../model/design.ys"
SBY 22:04:38 [ChisNesPad] base: finished (returncode=0)
SBY 22:04:38 [ChisNesPad] smt2: starting process "cd ChisNesPad/model; yosys -ql design_smt2.log design_smt2.ys"
SBY 22:04:38 [ChisNesPad] smt2: finished (returncode=0)
SBY 22:04:38 [ChisNesPad] engine_0: starting process "cd ChisNesPad; yosys-smtbmc --presat --unroll --noprogress -t 30 --append 0 --dump-vcd engine_0/trace.vcd --dump-vlogtb engine_0/trace_tb.v --dump-smtc engine_0/trace.smtc model/design_smt2.smt2"
SBY 22:04:38 [ChisNesPad] engine_0: ##   0:00:00  Solver: yices
SBY 22:04:38 [ChisNesPad] engine_0: ##   0:00:00  Checking assumptions in step 0..
[...]
SBY 22:04:39 [ChisNesPad] engine_0: ##   0:00:00  Checking assertions in step 29..
SBY 22:04:39 [ChisNesPad] engine_0: ##   0:00:00  Status: passed
SBY 22:04:39 [ChisNesPad] engine_0: finished (returncode=0)
SBY 22:04:39 [ChisNesPad] engine_0: Status returned by engine: pass
SBY 22:04:39 [ChisNesPad] summary: Elapsed clock time [H:MM:SS (secs)]: 0:00:00 (0)
SBY 22:04:39 [ChisNesPad] summary: Elapsed process time [H:MM:SS (secs)]: 0:00:00 (0)
SBY 22:04:39 [ChisNesPad] summary: engine_0 (smtbmc) returned pass
SBY 22:04:39 [ChisNesPad] DONE (PASS, rc=0)
This is just a little introduction on how to use yosys-smtbmc and symbiYosys to formally prove your chisel design.
Maybe this formal rules injector will be integrated in Chisel a day ?
En début d’année 2019 se posait la question de savoir si ce serait l’année de la libération des FPGA. En ce début d’année 2020, essayons de faire un bilan.
FPGA, ASC, HDL, RISC‑Ⅴ et PCB sont les chapitres que nous allons découvrir dans la suite de cet article. Si vous connaissez déjà ces sigles et acronymes, vous allez adorer ; mais si vous ne les connaissez pas, c’est indispensable car ces vocables sont à la base de la culture universelle de notre siècle.
Nous sommes actuellement arrivés à un moment clé pour le matériel informatique. Il en est au même point que le logiciel libre en était en 2000, quand il est devenu mature. Le mouvement est lancé et les projets deviennent utilisables. On ne rêve plus…
FPGA
À condition de choisir son FPGA cible, il est aujourd’hui possible de faire son développement intégralement à base de logiciels libres. Tout cela principalement grâce à Yosys et Nextpnr.
Les grandes avancées de Yosys
Yosys est un logiciel libre de synthèse [[Verilog]]. Il permet de convertir un modèle Verilog en une netlist. La netlist est tout simplement un schéma électronique comme on peut en faire avec un logiciel de saisie de schéma. On relie entre eux des connecteurs d’entrées‐sorties de composants pour réaliser un circuit électronique.
Cependant, en général, un logiciel de synthèse cible des FPGA ou des ASIC qui ont leurs propres bibliothèques de composants. Et la netlist générée est au format texte, même si une fonction de Yosys permet d’afficher le « schéma » au moyen de Graphviz.
Yosys augmente le nombre des FPGA officiellement pris en charge avec les FPGA de Gowin. L’ingénierie inverse du Gowin n’est pas encore terminée mais elle est déjà utilisable. C’est tout le travail de Pepijn De Vos avec son Project Apicula.
Plusieurs gammes de FPGA de Lattice sont désormais prises en charge. En plus du ICE40 initial, les ECP5 sont maintenant parfaitement utilisables et les nouveaux CrossLink (Nexus) sont en cours de « reverse engineering » (rétro‑ingénierie, voir ci‑dessous) avec le Project Oxide de David Sha.
Hormis la partie placement routage et bitstream, les FPGA de la série 7 de Xilinx sont assez bien gérés par Yosys (mais Yosys ne fait pas le placement‐routage). Et Google a fait un petit cadeau à la communauté libre en annonçant financer la prise en charge des (pas si) vieux Spartan3 et Spartan6.
NextPnR, le placement‐routage libre
Nextpnr est un logiciel libre permettant de faire le [placement‐routage(https://fr.wikipedia.org/wiki/Placement-routage). Le principe est assez simple, un FPGA disposant d’une matrice de composants gravés sur la puce, il faut décider quel composant de la netlist générée par le logiciel de synthèse ira sur quel composant présent dans le FPGA. Une fois les composants placés, il faut router les entrées‐sorties en réalisant les connexions.
Nextpnr est aujourd’hui parfaitement utilisable pour les FPGA ICE40 et ECP5 de Lattice. Pour les FPGA de Gowin, cela ne saurait tarder à mon avis.
Rétro‑ingénierie
Pour configurer un FPGA (établir les liens entre les bascules) il faut télécharger un bitstream. Le format de ce bitstream n’est documenté par aucun constructeur de FPGA. Nous sommes obligés de passer par les outils (gratuits, en général) fournis par le constructeur pour le générer.
Bien que n’étant pas documenté, le format n’est pas non plus chiffré, il est donc parfaitement possible de l’étudier par ingénierie inverse pour le documenter.
De plus en plus de projets de FPGA par ingénierie inverse de bitstream voient le jour. Votre serviteur tente de maintenir une liste de ces projets sur son blog en donnant l’état d’avancement des projets.
On décompte au moins neuf projets plus ou moins avancés de rétro‑ingénierie :
Notons que la marque Lattice est très représentée, alors que Microsemi est absent (à ma connaissance) de ces projets.
ASIC
Les ASIC ne sont pas des FPGA. Une fois que l’on a envoyé nos fichiers de production au fondeur, les composants ne sont plus modifiables. Et comme la facture est en général particulièrement salée pour produire une série, il faut en produire beaucoup et surtout ne pas se planter.
Une (vénérable) suite de logiciels libres appelée QFlow existe depuis plus de trente ans pour concevoir ces circuits intégrés spécialisés. Mais le site officiel fait particulièrement peur, et laisse croire que le logiciel est à l’abandon depuis bien longtemps.
Il n’en est rien, ce logiciel est toujours maintenu et est utilisé par de plus en plus de concepteurs ASIC pour produire des puces libres. On pense notamment au Raven à base de PicoRV32 (RISC‑Ⅴ) qui avait été décrit dans les colonnes de LinuxFr.org. On pense également au projet de FPGA libre kFPGA décrit également dans ces colonnes.
Un autre composant à destination des amateurs de rétro‑informatique est en cours de production par Staf Verhaegen avec le projet Chip4Makers. L’idée de Staf est que la production de composants ASIC coûte très cher à l’unité, il n’est donc pas possible de concurrencer les composants du marché avec un composant conçu « dans son garage ».
Cependant, il existe une frange de hobbyistes prête à payer plus cher pour retrouver leur vieux processeur 6502 ou Z80. Ce sont donc ces processeurs que Staf a inclus dans un unique composant, et la pré‑série a été produite d’après un de ses tweets. Les sources du composant en question sont disponibles sur sa projet GitLab.
D’autres instituts et fondations s’intéressent de très près à l’émergence d’outils libres pour réaliser des microprocesseurs et ASIC. On pense notamment à :
l’université Paris Ⅵ, qui fait bien trop peu de publicité de sa suite libre Alliance (synthèse [[VHDL]], pour faire des ASIC) — Mais pourquoi ce projet est-il si peu connu ?
HDL (Hardware Description Languages)
Yosys était jusqu’ici réservé à la synthèse Verilog. Mais grâce au travail de Tristan Gingold et Pepijn De Vos (principalement), il est désormais possible d’utiliser Yosys en conjonction de GHDL pour faire de la synthèse GHDL. Le projet est encore en beta‑test, mais Pepijn s’en sert pour faire de la synthèse TTL de ses porte‑grammes VHDL ainsi que de la vérification formelle.
Principalement grâce à Yosys, il est désormais tout à fait possible de faire de la vérification formelle pour valider ses composants. C’est le cheval de bataille de Dan Guisselquist, avec son projet de processeur nommé ZipCPU.
Le langage de haut niveau Chisel est maintenant relativement mature. Le projet fait partie de la fondation Linux et la conférence annuelle CCC (non pas Chaos Communication Camps mais Chisel Community Conference) est soutenu par des gros industriels comme Western Digital ou Cadence.
Toute la gamme des processeurs développés par SiFive est écrite avec Chisel, Google a utilisé le langage Chisel pour son processeur d’intelligence embarqué Edge TPU.
Le langage nMigen basé, lui, sur Python essaime aussi pas mal, mais surtout dans le milieu de la recherche.
CλaSH est sortie en version 1.0. Cela faisait des années qu’il se traînait avec des version 0.x, le passage à 1.0 est un signe de maturité. CλaSH est basé sur le langage au paradigme fonctionnel [[Haskell]]. Je ne peux hélas pas vous en dire plus aujourd’hui car je n’ai par réussi à percer le secret de cette logique de matheux qu’est le paradigme fonctionnel. :)
Cocotb a désormais un vrai rythme de développement et est utilisé en production pour de « grosse » IP comme l’USB. La version 1.3 est sortie en ce début d’année. Cocotb est un module Python permettant d’écrire des bancs de test HDL. Cocotb a la particularité de se connecter à un simulateur « du marché » pour lire et écrire les valeurs de signaux. Cela permet de garder son simulateur HDL parfois acquis à grands frais.
Verilator, le simulateur Verilog le plus rapide du « marché » (plus rapide que tous les simulateurs commerciaux) continue à être activement développé. Les récents commits permettent aujourd’hui de l’utiliser avec Cocotb. Et son passage à la version 4.0 permet une pleine utilisation des multiples cœurs de nos PC actuels, améliorant encore ses performances.
RISC‑Ⅴ
On peut aujourd’hui dire sans sourcilier que l’année de libération des processeurs est passée grâce au jeu d’instructions RISC‑Ⅴ.
Il n’est plus nécessaire de présenter ce jeu d’instructions aujourd’hui, et nous pouvons nous procurer tout un tas de microcontrôleurs basés sur RISC‑Ⅴ pour une somme d’argent (plus ou moins) modique.
Voici une petite liste de microprocesseurs RISC‑Ⅴ disponibles sur le marché :
Hormis l’U540 et, dans une certaine mesure, le K210, tous ces processeurs sont des microcontrôleurs orientés basse consommation. La question qui est sur toutes les lèvres aujourd’hui, c’est : RISC‑Ⅴ va‑t‑il percer dans le monde du serveur et du calcul parallèle ?
Circuits imprimés
Kicad est un logiciel de conception électronique pour fabriquer des circuits imprimés, également appelés PCB. C’est un logiciel initialement développé par un français (cocorico) qui inclut toute la suite de logiciels nécessaires à l’électronicien :
la schématique ;
le routage ;
et même maintenant la simulation de la gestion des coûts en composants (BOM) ;
etc.
Kicad est longtemps resté un logiciel anecdotique (mais parfaitement fonctionnel), jusqu’à ce que le CERN s’y intéresse et finance des ingénieurs pour améliorer la partie routage. Aujourd’hui, Kicad est soutenu par la Fondation Linux et a lui aussi sa conférence annuelle prestigieuse : la KiCon.
Ils sont emprisonnés depuis trop longtemps, mais nous ne les avons pas oubliés !
Pour conclure, nous pouvons affirmer que la libération des FPGA est maintenant bien engagée. Et nous assistons aujourd’hui à l’émergence du matériel libre du point de vue du cœur de la puce : le silicium.
La liberté dans ce monde stagnait depuis des dizaines d’années, mais les choses décollent aujourd’hui. Et on entend le même refrain contre le Libre que l’on entendait dans les années 2000 sur le logiciel. Pour quelqu’un qui chercherait un projet libre sur lequel se lancer pour faire ses armes, comme pour la conquête de l’ouest, l’espace est encore vierge et c’est le moment de se lancer.
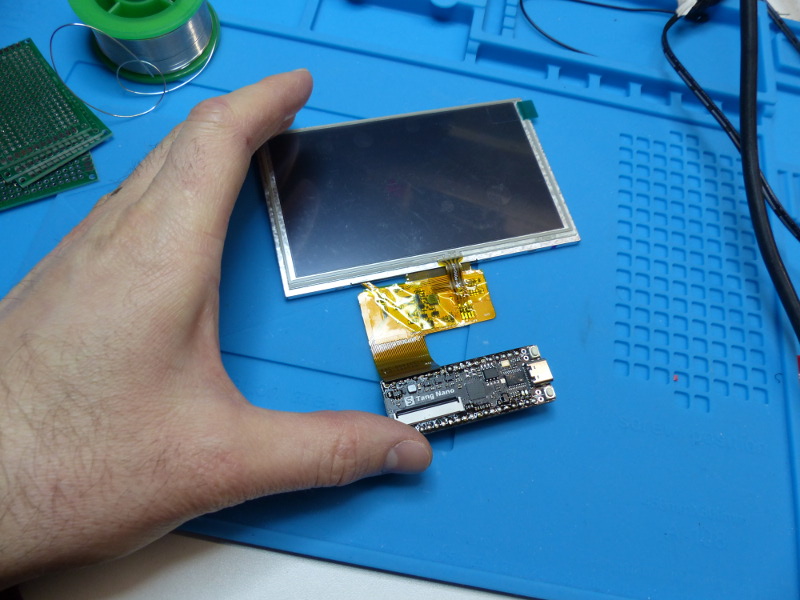
Sipeed continue dans sa course à l’échalote des kit FPGA low cost en proposant un kit Gowin à $4.90. Évidemment à ce prix là c’était trop tentant d’en prendre un. Bon en vrai vu que les frais de port ne sont pas négligeable j’ai également pris l’écran proposé et je m’en suis finalement sortie pour une vingtaine d’€. Ce qui reste néanmoins raisonnable.
Le petit kit Tang Nano à $4.90
Le kit est fourni avec des headers males (pattes) non soudés. Ils ne sont pas nécessaire pour faire clignoter la LED ou pour jouer avec l’écran, mais c’est quand même utile.
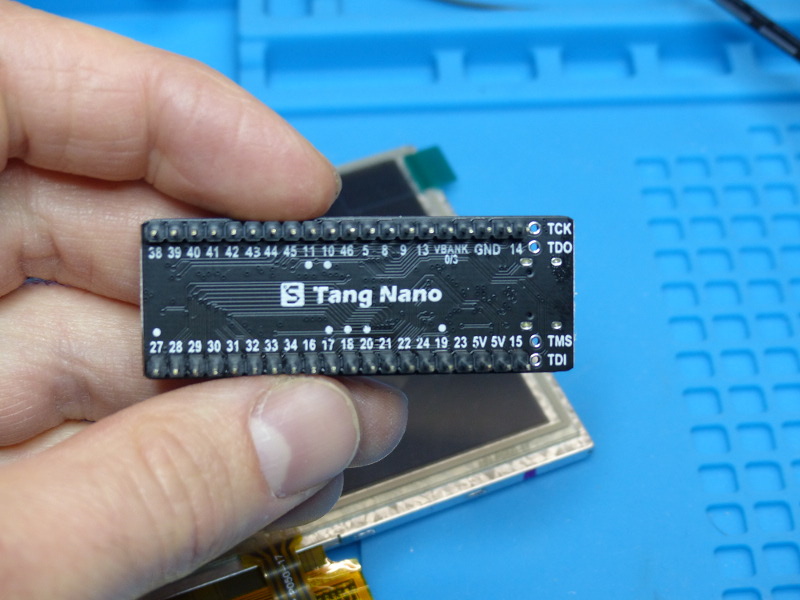
Le dessous de la carte avec le pinout.
Premier boulot en recevant le truc donc : souder les headers.
Pour 13$ de plus on a l’écran compatible avec le connecteur
Le FPGA soudé sur la carte est un GW1N-LV1, assez petit donc, mais il reste raisonnable puisque de la même taille que le ice40 soudé sur le icestick. C’est d’ailleurs le kit utilisé actuellement par Pepijn de Vos son projet d’ingénierie inverse nommé Apicula (mais chuuut le projet n’est pas encore public !).
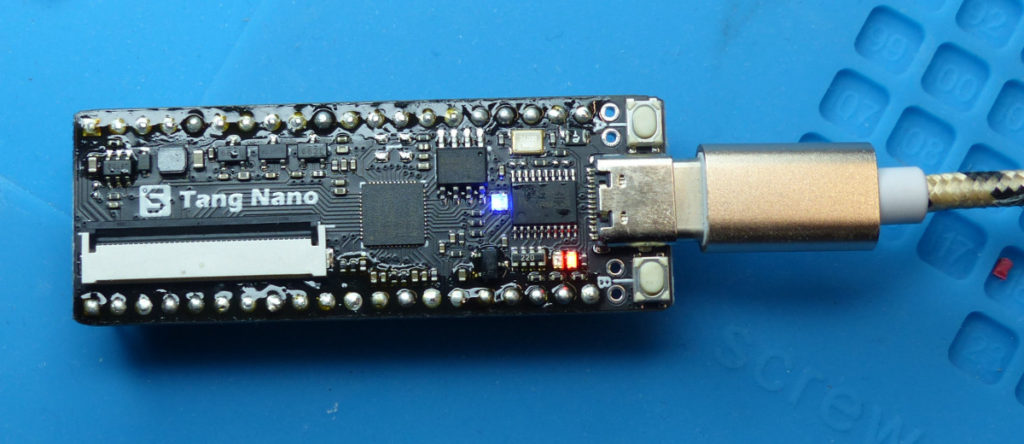
Le branchement se fait au moyen d’un câble USB-C non fourni. Au premier branchement, la LED rouge qui semble être celle de l’alimentation s’allume et la led RGB du centre se met à clignoter en allumant les trois couleurs à la suite.
Pimp my blinker !
Les messages noyau m’affichent le traditionnel double tty typique d’un convertisseur USB-Série habituel (CH552T, un microcontrôleur chinois):
$ sudo dmesg -c
[365812.686837] usb 3-2: new full-speed USB device number 25 using xhci_hcd
[365812.838484] usb 3-2: New USB device found, idVendor=0403, idProduct=6010, bcdDevice= 5.00
[365812.838490] usb 3-2: New USB device strings: Mfr=1, Product=2, SerialNumber=3
[365812.838492] usb 3-2: Product: Sipeed-Debug
[365812.838494] usb 3-2: Manufacturer: Kongou Hikari
[365812.838496] usb 3-2: SerialNumber: 85522A1A47
[365812.840468] ftdi_sio 3-2:1.0: FTDI USB Serial Device converter detected
[365812.840534] usb 3-2: Detected FT2232C
[365812.841192] usb 3-2: FTDI USB Serial Device converter now attached to ttyUSB0
[365812.841373] ftdi_sio 3-2:1.1: FTDI USB Serial Device converter detected
[365812.841427] usb 3-2: Detected FT2232C
[365812.841727] usb 3-2: FTDI USB Serial Device converter now attached to ttyUSB1
On remarquera que cette fois le numéro de série n’est pas en chinois 😉
La connexion au ttyUSB0 (en 115200) fournie un echo du clavier un peu bizarre :
Il est fort probable que le kit soit entièrement utilisable avec des logiciels libre à Noël lors de la grand messe allemande : le Chaos Communication Congress à Liepnitz.
Pour le moment nous allons nous contenter de l’IDE chinois fourni, que j’avais déjà installé pour le little bee. Pour le code, il y a des exemples fournis sur le github de sipeed. Pour la documentation c’est par ici. Et comme d’habitude avec les trucs chinois, quand la doc en anglais semble trop limitée, ne pas hésiter à aller faire un tour sur la version chinoise à coup de google traduction.
Trucs:
Si le floorplanning ne veut pas se lancer c’est qu’il faut bien configurer sa variable LD_LIBRARY_PATH avant de lancer l’appli: